


Intro
This is the inaugural article to "What I learned in Solidity today". This is a series that I'm going to be doing discussing my journey in learning Solidity and becoming really good at it. How this initiative came about is that while I was at ETHDenver, I noticed that everyone that I was talking to who were founders (or hiring in general) were looking for Solidity devs. That really inspired me to follow a different track and pivot into what is in high demand right now (and a language that I actually enjoy learning about).
So, to kick off my learning I built a simple vending machine contract. I followed a great tutorial on Youtube on it (I'll tag below), this article is just me regurgitating what I learned. Side note - I've dealt with smart contracts before (I've dropped my own NFT collection) so this is not my first rodeo. I just want to slow down and make sure that I'm paying attention to what I'm learning.
Quick interesting standout concepts
The first thing that I noticed was that Solidity is based a ton on functions. You will need to do well at writing (and understanding) functions to understand it as a language. Although it's not very logic heavy - it is very function heavy. To add to my above statement, something that also clicked for me was the importance of architecture. Since you'll need a good amount of functions (depending on what you're trying to do), you'll want to make sure you plan out the structure of your smart contract. You need to know what all you want to happen in your contract so that you can properly write out your functions. It will also make your life easier when you do write out your functions. "If you fail to plan, you plan to fail". Ok - let's get started. This is going to get extensive, I want to cover everything from top to bottom...for my own sake.
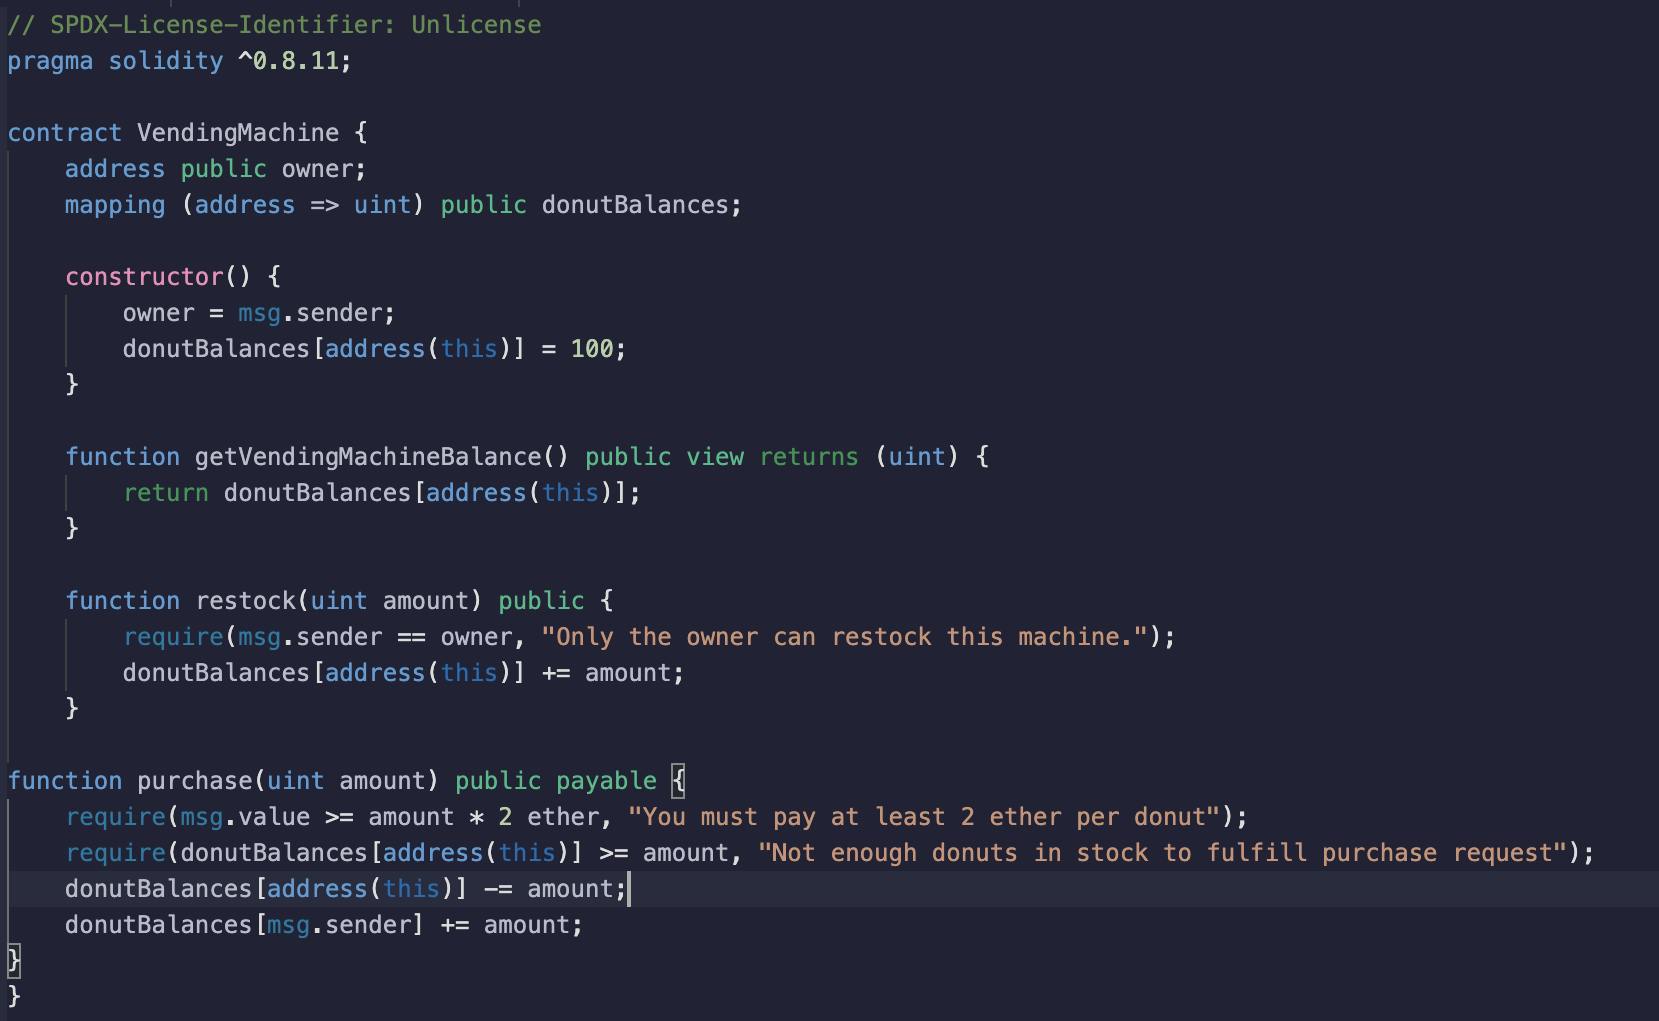
Here is a screenshot of what the finished code is going to look like. Everything is coded in Remix, which is a browser-based code editor built for Solidity programming.
Setup
You need to specify the license first and foremost - which is why you have to type out the "SPDX..." this is a requirement in solidity. Next, you need to specify which version of Solidity you are using. For this, it was version 0.8.11.

Contract & Variables
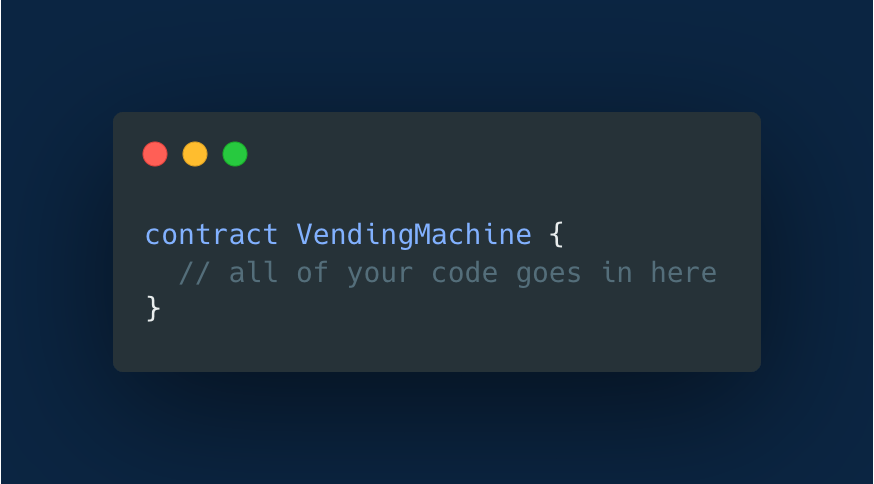
Next, you need to initialize the contract. This is very important because all of your functionality will go inside of here. Anything outside of here will break your contract (unless it's in another contract).
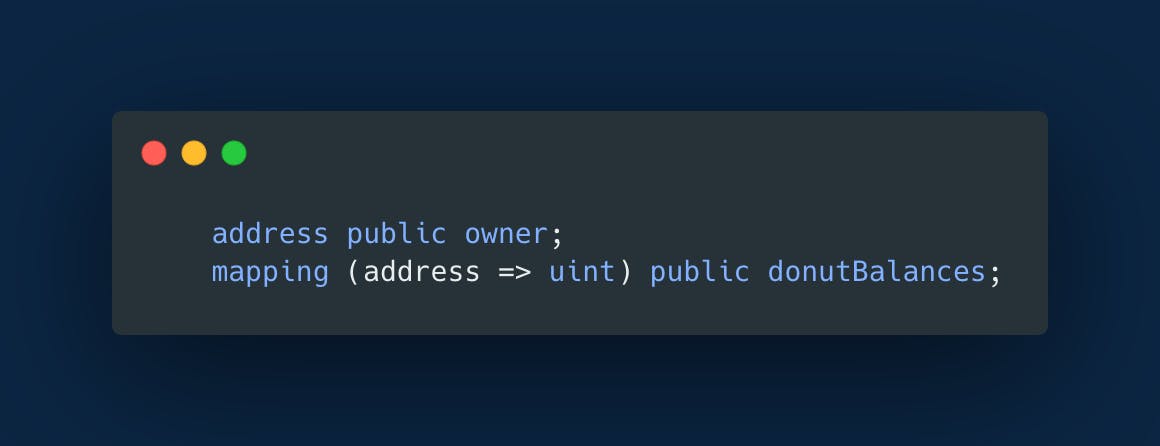
The next thing that was created was two variables address and mapping. These two variables will be vital for our smart contract to know what we're referencing and how they should be treated when we reuse them later in the contract.
 As you can see, the
 address variable is given the visibility of public. This means that it can be viewed outside of the contract. This is important because when transactions are made (i.e someone purchases from the vending machine) the contract needs to be allowed to show the address to where the funds should be sent to. One thing that you will also notice is that the value that is stored inside of the address variable is the owner value. What this indicates is that the address that is being used, or better yet, the address that should be paid is the owner of the contract.
The second variable - the mapping variable acts as a hash table where you pass in key types and value types. In our case, we're mapping the address to a uint value. A uint is simply an "unsigned integer". We make it the visibility of public and inside of the mapping we store donutBalances. This mapping is going to allow us to give donutBalances an actual numerical value later.
Functions
Moving right along - remember how I said that Solidity smart contracts are made up of mostly functions?...well, we're about to dive headfirst right into them.
 First up, is the
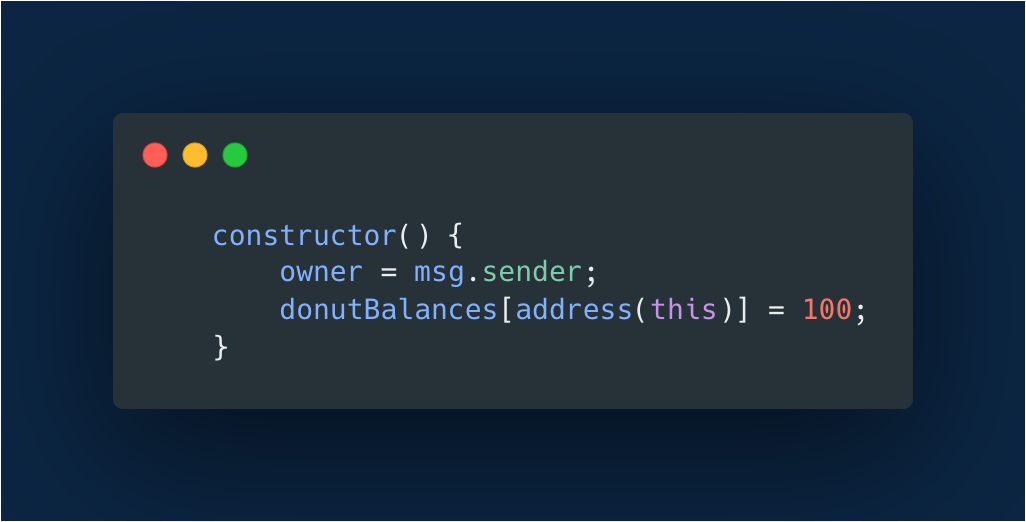
 constructor function. Now, this is a special type of function in Solidity that when it runs, it only runs once. Inside of it, we're giving it two instructions. We're saying:
We want the
msg.sendercall to be stored inside of the value ofowner. This is going to allow the owner's address to be called when a purchase is made.msg.sendercall is actually a part of a global variable calledmsg.. There are other values that can be placed with this variable, but the most common one that you will see ismsg.sender.We want to give the
donutBalancesvalue a numerical value. As you can see it's placed in an array with a value ofaddressin it and a method ofthisas well. Thethiskeyword is basically referencing the contract. Think of it like, "Hey, I want the donutBalances that we are specifying to go inside of 'this' contract".
More Functions...
Let's keep rolling with the functions! The next few functions that we will cover are the same type of functions that you will see in any other programming language (i.e if you're coming from a language like JavaScript). This is where we will begin to implement the bulk of our functionality.
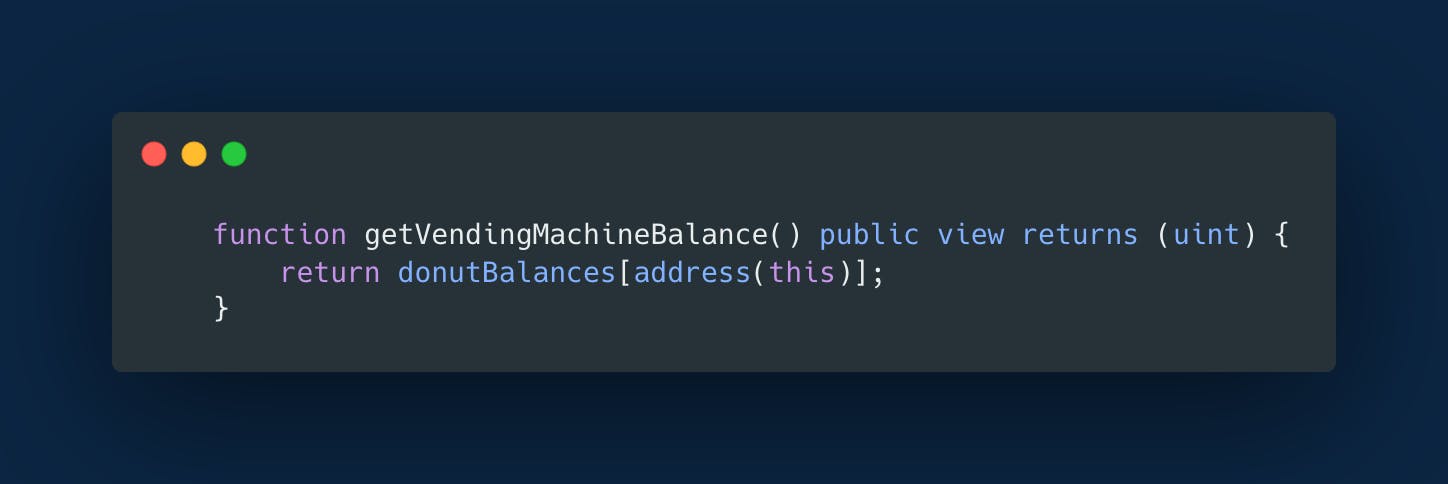
The first function that we will cover is the getVendingMachine function. We give it the visibility of public and then we introduce a new modifier of the function - the view modifier. What the view modifier does is that it stops the function from modifying the state variables. So, it's making sure the function is read-only meaning none of the variables inside of it can be modified. Next, we see the returns modifier, which is also a new one that we introduced. The returns modifier lets the smart contract know that we are looking to return something inside of the function. What you see next to it is a value of (uint) being passed in. You can always expect this to be the case when you see the return modifier (although the value being passed in will not always be a unit).
Next, we tell our function that we want to return the donutBalances. So, when our getVendingMachine function is called, we expect it to tell us how many donuts we have left in our vending machine. That's pretty much the gist of this function. This is one of the functionalities that we want our Vending Machine contract to have.
You Guessed It, Another Function!...
The third function that we will cover will give us the ability to restock our vending machine when our donuts are low. Check it out!
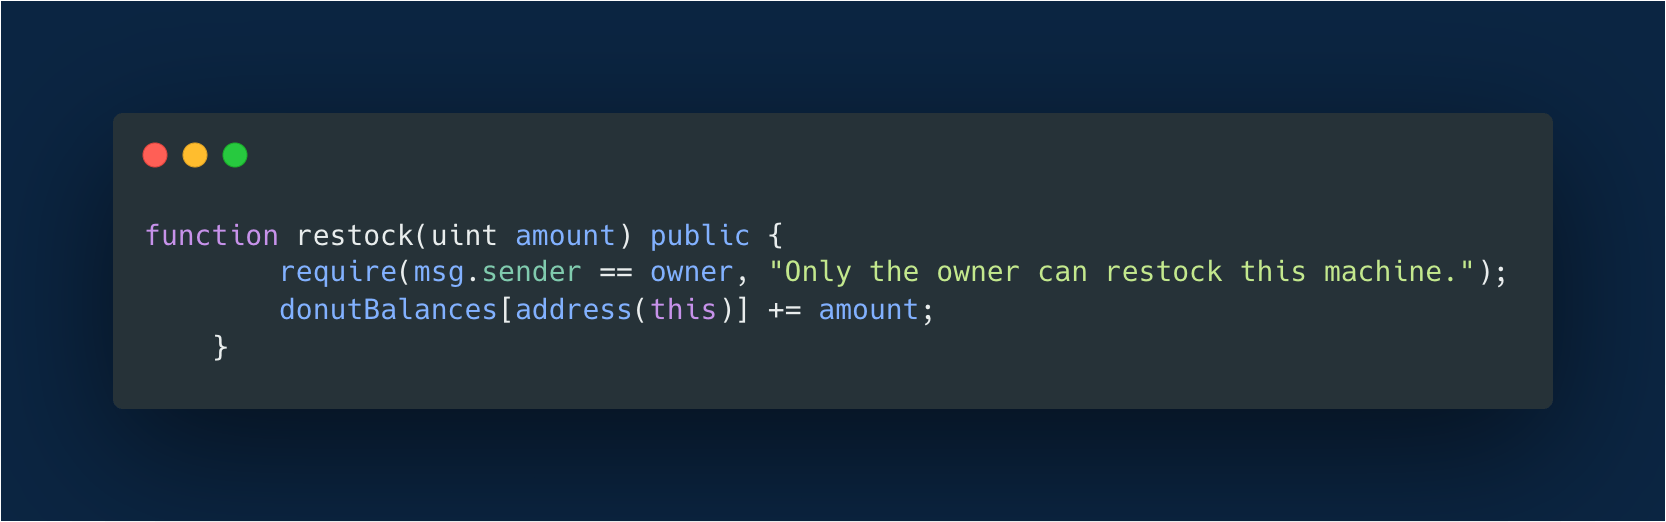 With this function, we pass in a
 uint value and call it amount. We set the visibility to public and here is where we introduce require. Require is a check. Its purpose is to tell the contract, "Hey, make sure that this (whatever you pass in) is checked for before you run this function. What we have passed in is a parameter that says the msg.sender call needs to be equal to the owner in order for this function to be allowed to run. Otherwise, send an error message that says "Only the owner can restock this machine". We also use our amount value. We passed it in as uint because it's not intended to have an assigned value. The reason for this is that we don't want to have a set amount that we can restock (i.e assigning it a value of 4. Which would mean that we would only be able to restock 4 at a time). We want to be able to restock it with whatever amount that would get us back to our original 100. This brings us to the next thing, our operators. We use the += operator to be able to increment when we need to restock our vending machine.
So, tying this function altogether, we are telling our contract "when it is time to restock the vending machine make sure that only the owner of the contract is allowed to restock. If not, let whoever is trying to restock the machine know, that only the owner has the power to do so". In addition to that, we are creating the functionality that when we check our vending machine and see that it is low, we have the ability to restock it.
Last Function...I Promise...
The fourth and final function that we'll discuss is the purchase function. This is where we will allow those who come to the vending machine the ability to purchase things. This function has a bit more meat on it, so it'll be a little more explaining.
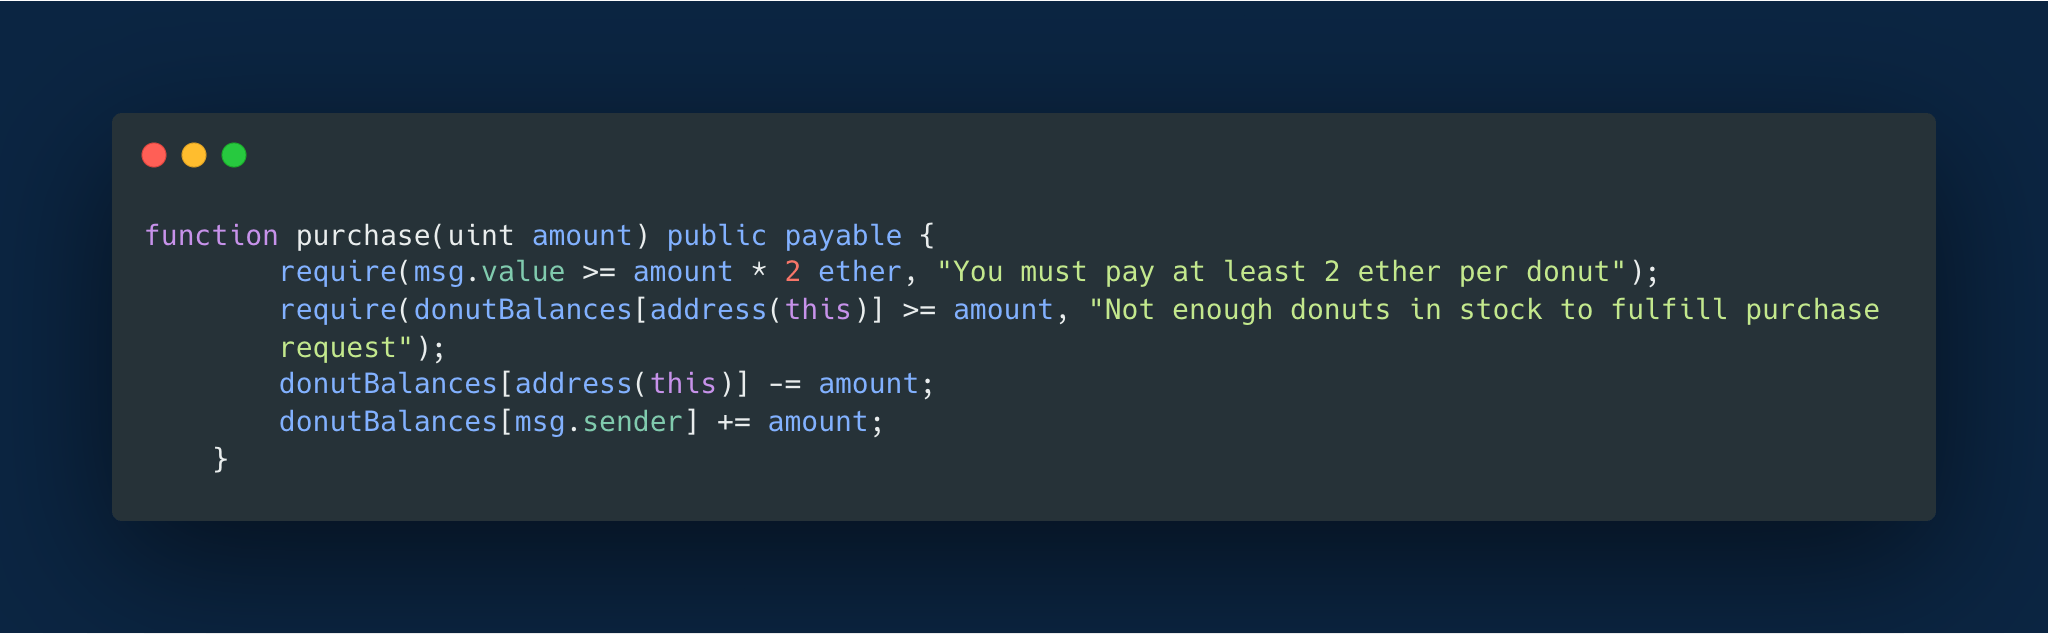 We pass in the
 amount value the same as we did in the previous function because people will need to be able to increment and decrement the amount. Next, we make the visibility public so that we are able to access it outside of the contract. In this function, we introduce another new modifier - the payable modifier. This modifier allows the function to be able to process transactions with non-zero Ether values. On the contrary, if this function is expected to be called in order to transfer Ether - and it does not have the payable modifier - then the transfer will be rejected.
We call another require check to make sure that the contract checks for a couple of things before the function is allowed to run. We tell it to check and make sure that the msg.value is greater than or equal to however many they are purchasing times 2 ether. So, basically, each donut is worth 2 ether (pretty expensive for a donut if you ask me). But let's talk about the msg.value call. This is a new call. As I stated before, the msg. call has many different values that can be attached to it. The .value is the number of wei sent with the message. So, we want to require that when someone is purchasing, they send over Wei when they do. Otherwise, we send the message that "You must pay at least 2 ether per donut". We also send another check that says to make sure that the donutBalances are greater than or equal to the amount. And if there is no more in the machine, let them know that there aren't enough donuts in stock to fulfill that person's request.
Wrapping up, the last thing is that we allow the person purchasing to decrement and increment the amount that they want. So for the decrement, you see the -= operator. This is going to allow whoever is buying to choose a less amount if, by chance, they entered in too much. On the opposite end of the spectrum, we see the += operator allowing the purchaser to increase the amount that they want.
That's It!
And that's it! Thank you for following my learning! This helps me make the concepts that I'm learning more concrete and I love bringing people along with me when I'm learning. Huge shoutout to Block Explorer's Youtube channel! He really does a good job at teaching basic concepts of Solidity. As promised, I'll link the entire Youtube video that walked me through building this vending machine contract. I suggest watching it if you want to learn how to deploy and interact with the smart contract. Until next time!